Sales Billing
3.1 How to create a new sales bill?
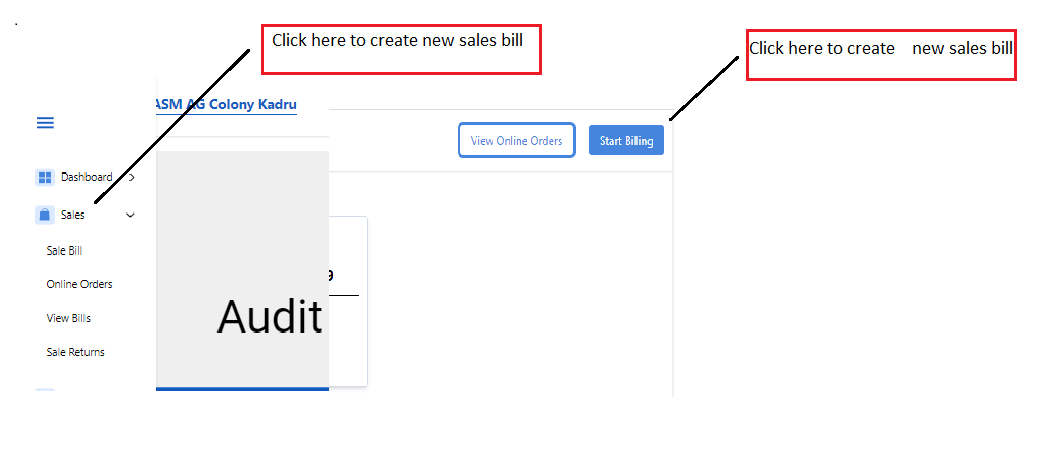
You can create a new sales bill on the sales billing screen. You can reach it by clicking the “Start Billing” button in the header on all pages. You can also click on the “Sales Bill” option available in the navigation bar under the Sales module.
3.2 How to add items to a sales bill?
The sales billing page has an input section that is used to add new items to the sales billing cart.
Items can be added by 3 methods
- Scan the item barcode
- Add item-by-item code
- Search & Select item by Item Name
When a barcode is scanned or an Item code has been entered, the item will get selected automatically.
If the selected item has multiple batches, the user will be prompted to select the correct batch as shown below.
After the item has been added, you will also be able to select and change the quantity of the added item.
Alternatively, you can add the same item by scanning the barcode of the item again.
When you want to add an item by the item name, you will be able to search by item name in the same text field.
Click on enter after you type your item name to load items
This will load the items as shown below. You can select the item that you want to add and add it to the cart.
Note: If the selected item has multiple batches, then you will be prompted to select the correct batch
3.3 How to link customers to sales bills?
On the sales billing page, there is a section where you can search by customer phone number or loyalty card.
To add by customer phone number:
Enter the phone number & click enter to search & select
If a customer account exists with the entered number, it will be selected. Details such as Customer Name & Loyalty Points available in the account will be displayed in this section.
If the Customer is not added, after entering the mob number it will direct you to the Customer info section where you can add the customer.
To add by loyalty card:
In the same text field, you will be able to select a customer automatically by scanning the barcode on the loyalty card. if the customer is not added, after entering the mob number it will direct you to the Customer info section where you can add the customer.
Add a new customer:
You will also be able to create a new customer by clicking on the f3 button on your keyboard.
You will need to enter the customer details such as customer name, phone number, loyalty card id, etc. Once done, click on save to create & select the customer.
Note: If you have selected the wrong customer & would want to change the selected customer, you will be able to click on the option “Remove”. This will let you select a different customer.
Note: If you have selected the wrong customer & would want to change the selected customer, you will be able to click on the option “Change Customer”. This will let you select a different customer. And if you want to change or Edit the details of an existing Customer you can do by clicking on the edit option.
3.4 How to save a sales bill?
You can save the bill after you have
- Added all items that needed to be sold
- Added & selected the customer (Optional)
You can save a bill by clicking on the “Make Payment”
This will open the payment mode & amount panel. You will be able to enter the amount paid by the customer using modes such as Cash, Card, UPI, and Apna Loyalty Points.
You will also be able to split the Total Amount into multiple modes. Eg: A total amount of 100 was paid by the customer in “Cash & UPI” or “Card & UPI & Cash” and so on.
The Loyalty points available for a customer will be converted to redeemable amounts & shown in the Payment pop-up under the Loyalty Points Mode Field
After you have entered the paid amount, Click on the Save button to Save the sales bill & print the sales bill.
Note: To quickly populate the paid amount, you can press the Enter button.
How to print a sales bill?
After you have saved the sales bill, there will be a preview of the sales bill. You would need to click on print to physically generate the print.
After the bill is printed/saved you will be able to exit the screen and start a new bill with the ESC button.
3.5 Online Order Details
You can see all the details of all the online orders by clicking on the "view online order" button in the top right corner of every page and from the sales module also.
it will navigate you to the online orders page where you can see all the details regarding online orders such as Time, customer Id, Order no, etc. and you can create the bill by clicking on the "Create Bill" button.
After clicking on Create Online button it will automatically create the bill by taking the details. You can enter the discount or coupon code and click on make payment button and follow the steps as Shown in article 3.4
3.6 View Sales Bills
3.6.1 How to view previous sales bills?
In the navigation bar, click on “View Bills” in the sales module.
View Sales Bill Screen will be displayed with existing sales bills.
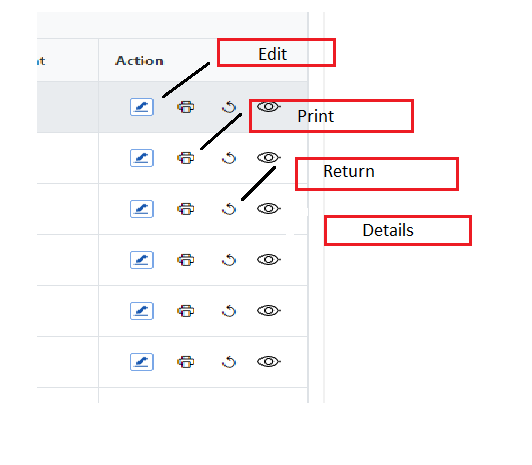
3.6.2 What actions are available for previous sales bills?
Here are the actions available on the view bills page
- Edit Payment Mode
- Reprint the Sales Bill
- Initiate a Return & Refund
- Details
3.6.3 How to search for a previous bill?
Search functionality is available on the view bills page. You can search by bill number using this field. Enter the bill number you want to view in the text field & Click on the search button. This will load the bill. You can then perform the required actions on this bill.
3.7 View Sales Return
3.7.1 How How can you see Sales Return
You can see all the sales return by clicking on the sales return option in Navigation Bar.
You will get all the details of return sales after clicking o the button, Such as Bill no, Sales Return no, Sales Return Date, etc.
3.7.2 How to create sales Return
you can create the sales return after clicking on create sales return button and able to see the particular bill detail.
you can search for the product by entering bill no.
you will get all the details regarding the bill no which you have entered. then you can enter the return quantity and click on calculate the refund amount.
you can take the amount in cash or by UPI and then click on save
then you will get a confirmation popup
